
Classic Cars / Chevrolet / Car for sale
Impala as in 1962, 1963, and 1964 Super Sport Trim
Sale price: $25,000.00 make an offer
Seller's notes: "Nice driver but needs paint to be show quality. The Convertible top is manual but new automatic pump parts can be added. Some dummy prior owner must have let a passenger flip a cigarette butt out and consequently there is a burn spot in the top but its not through... see it in pictures. This car was once restored as a low-rider car but it has now been put back to regular ride now but is lower with shortened springs. Extra stock springs are included with the car. It is not an SS but rather an SS clone - looks SS and has all SS badging."
Sale type: Fixed price listing
Technical specifications, photos and description:
- Year:
- 1963
- Mileage:
- 70,335
- Got questions?
- Ask here!
Impala as in 1962, 1963, and 1964 Super Sport Trim for sale
Current customer rating: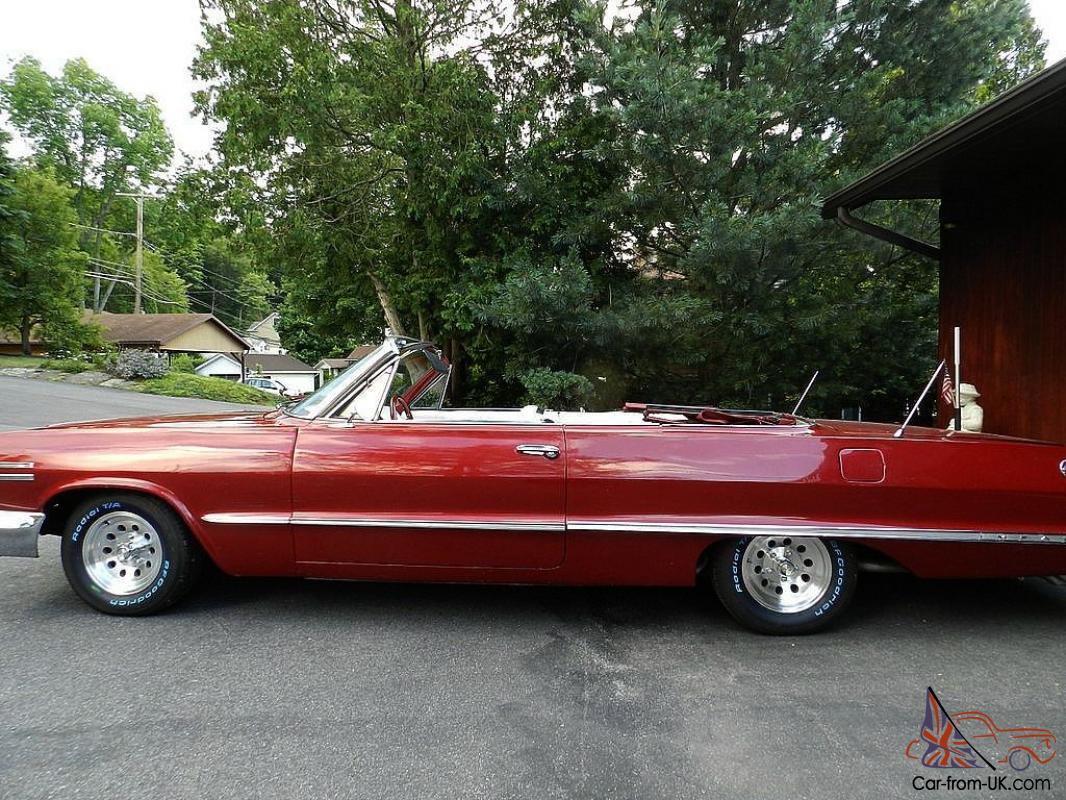
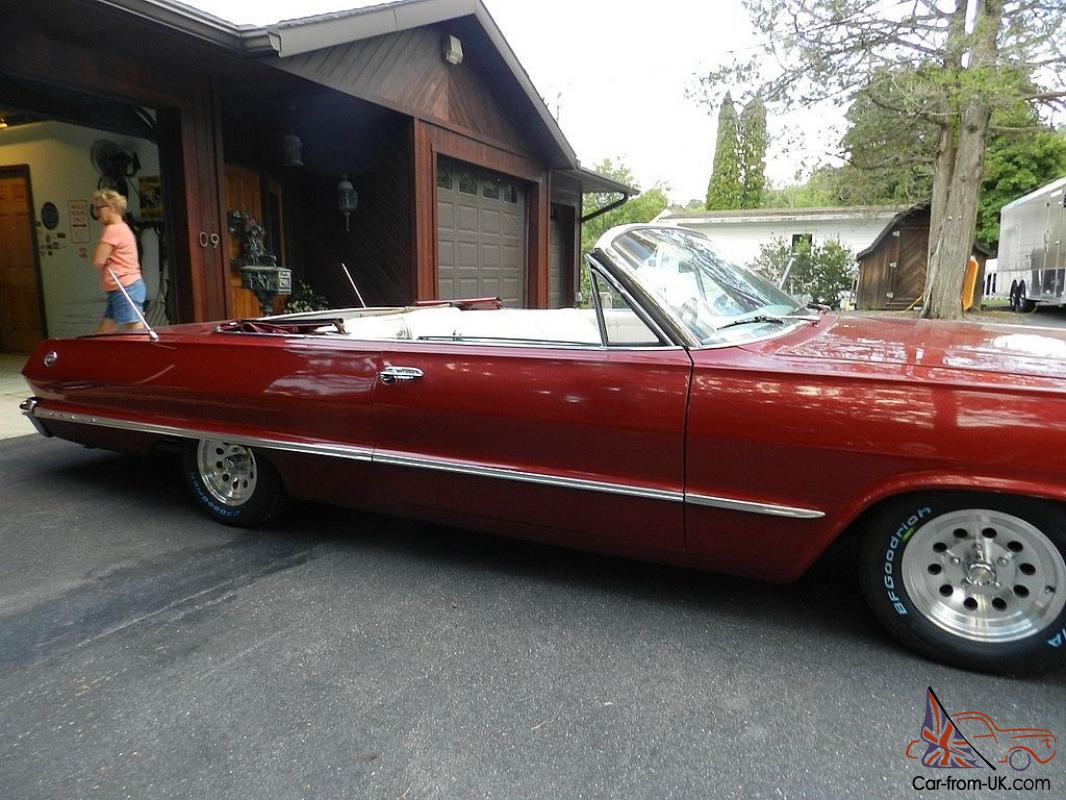

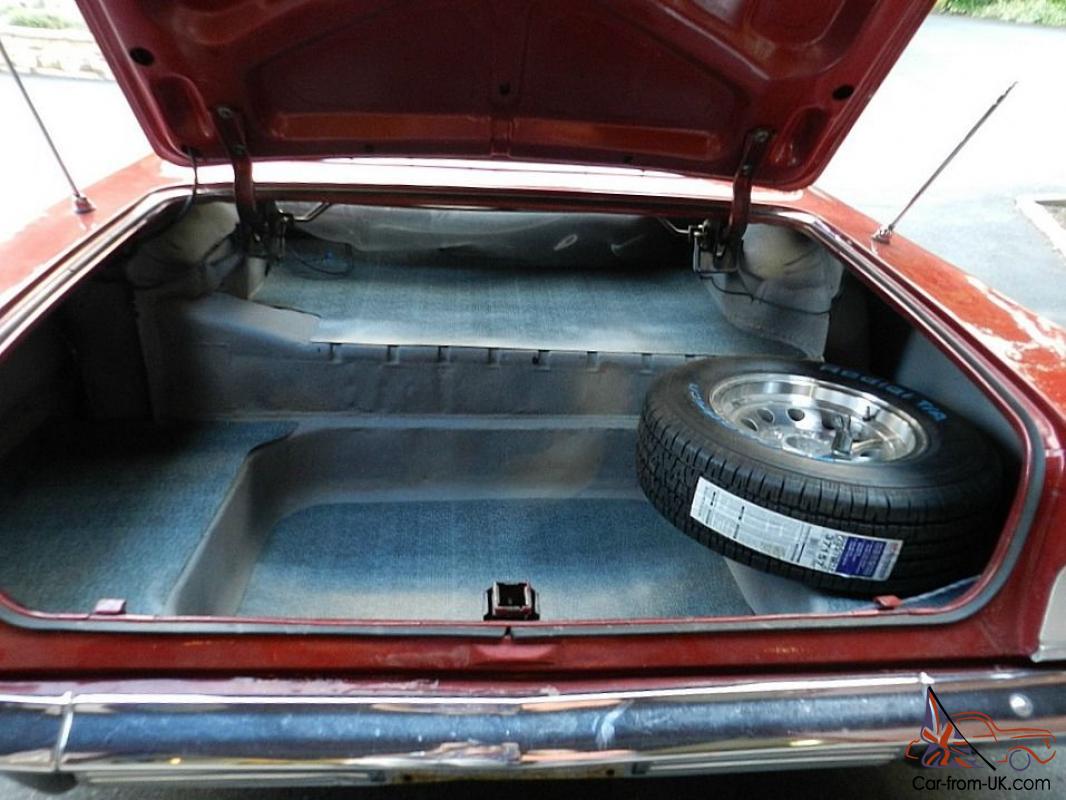
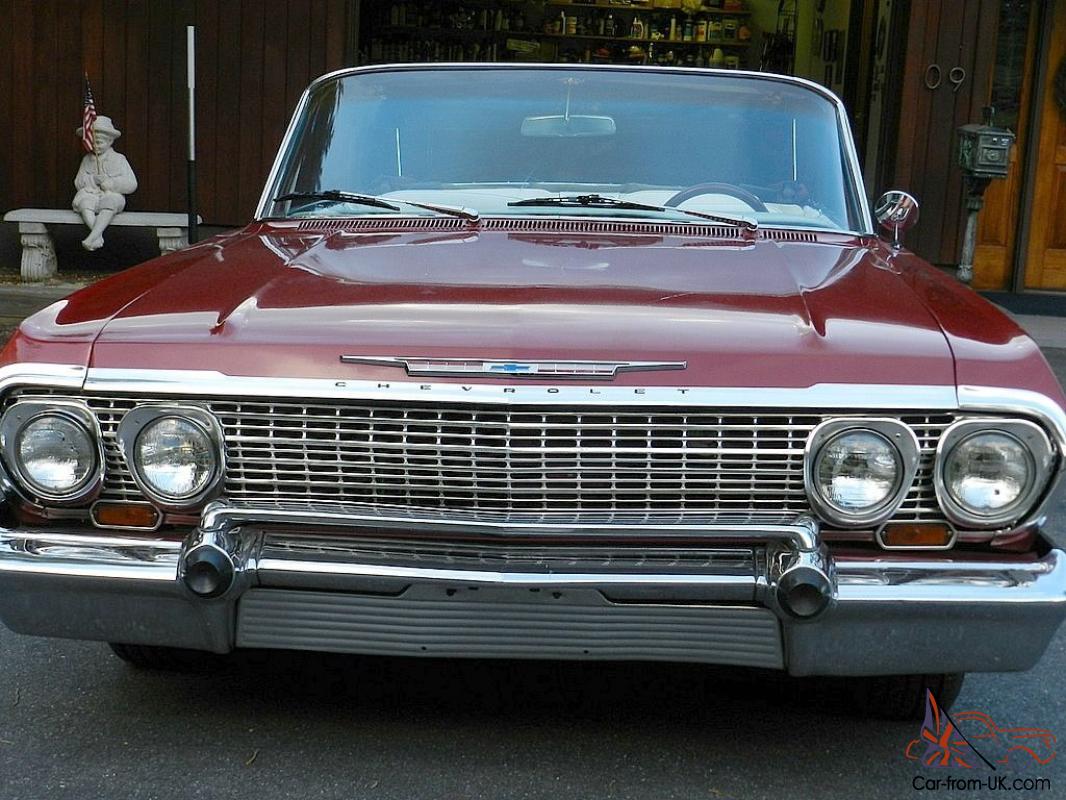
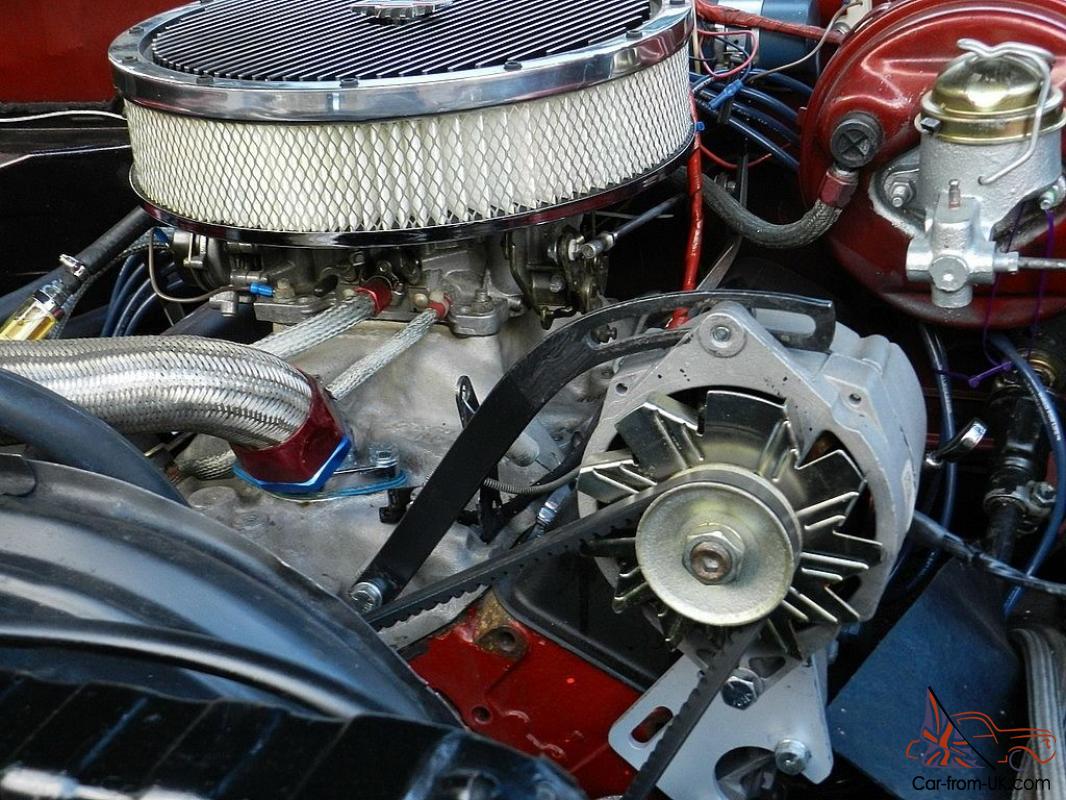

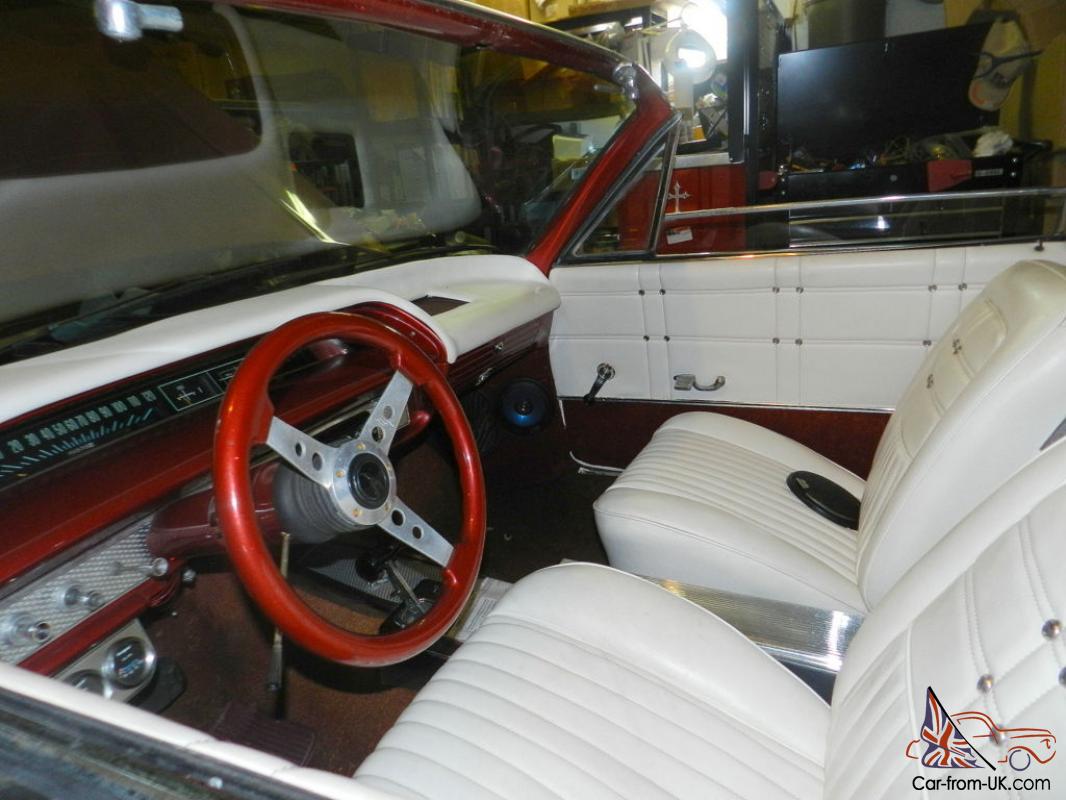
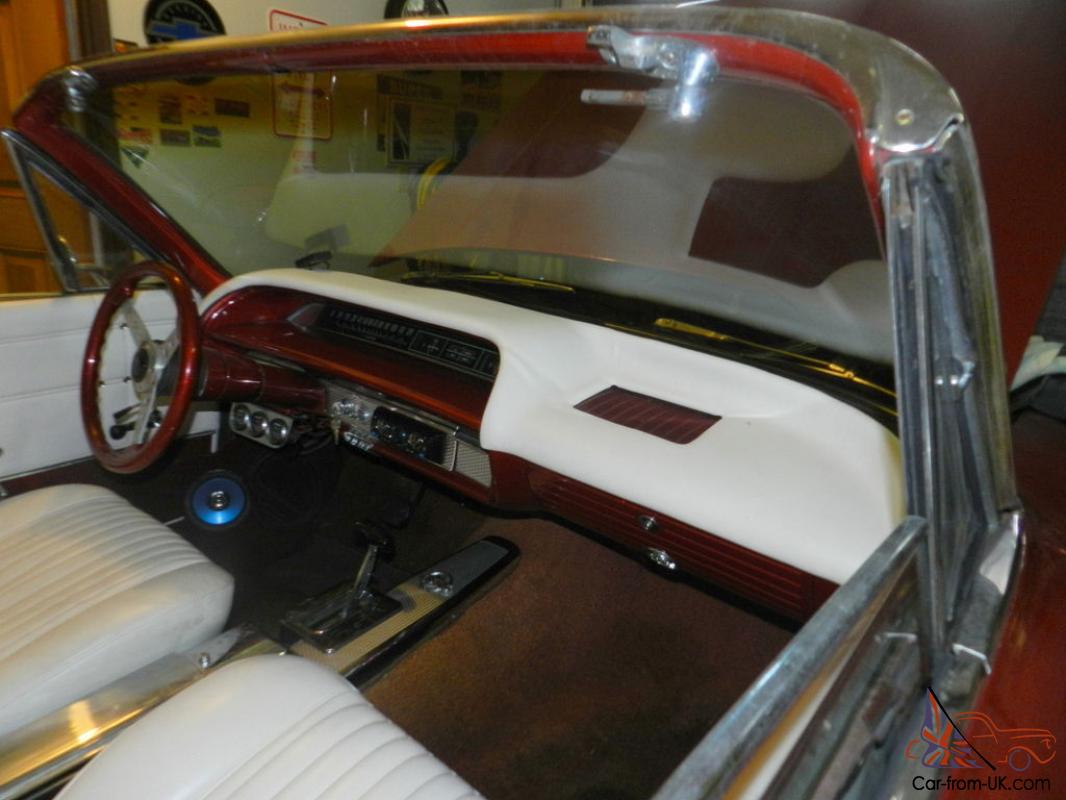
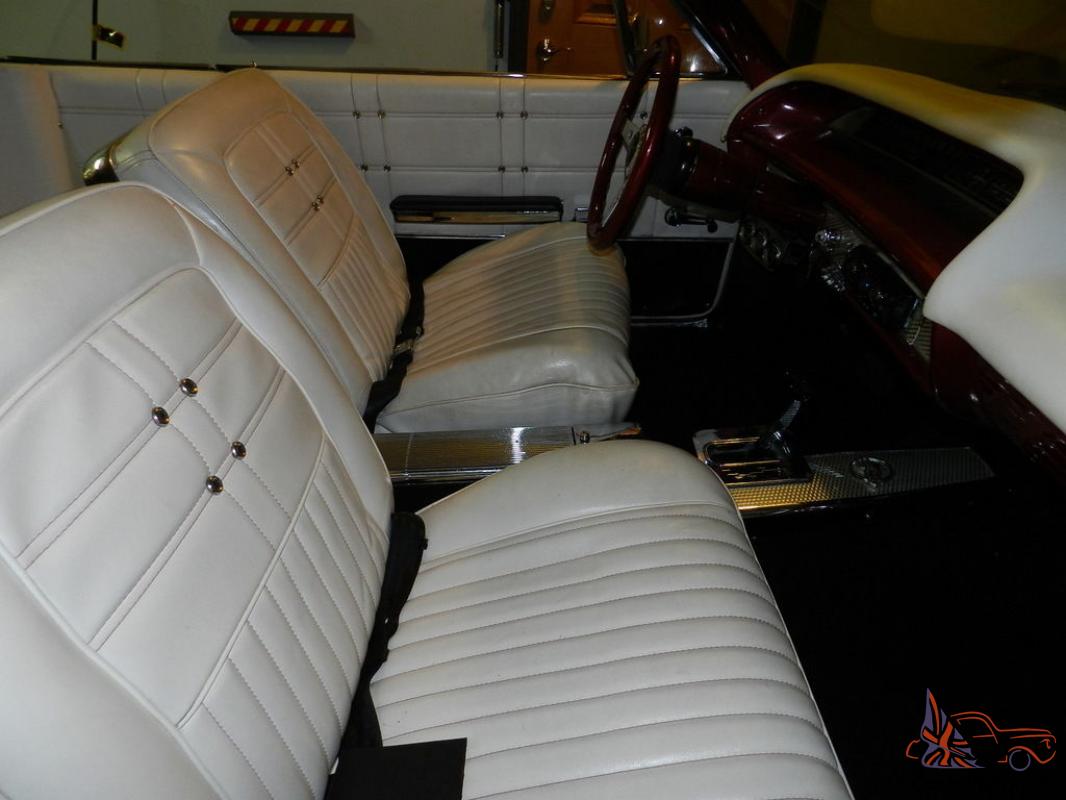
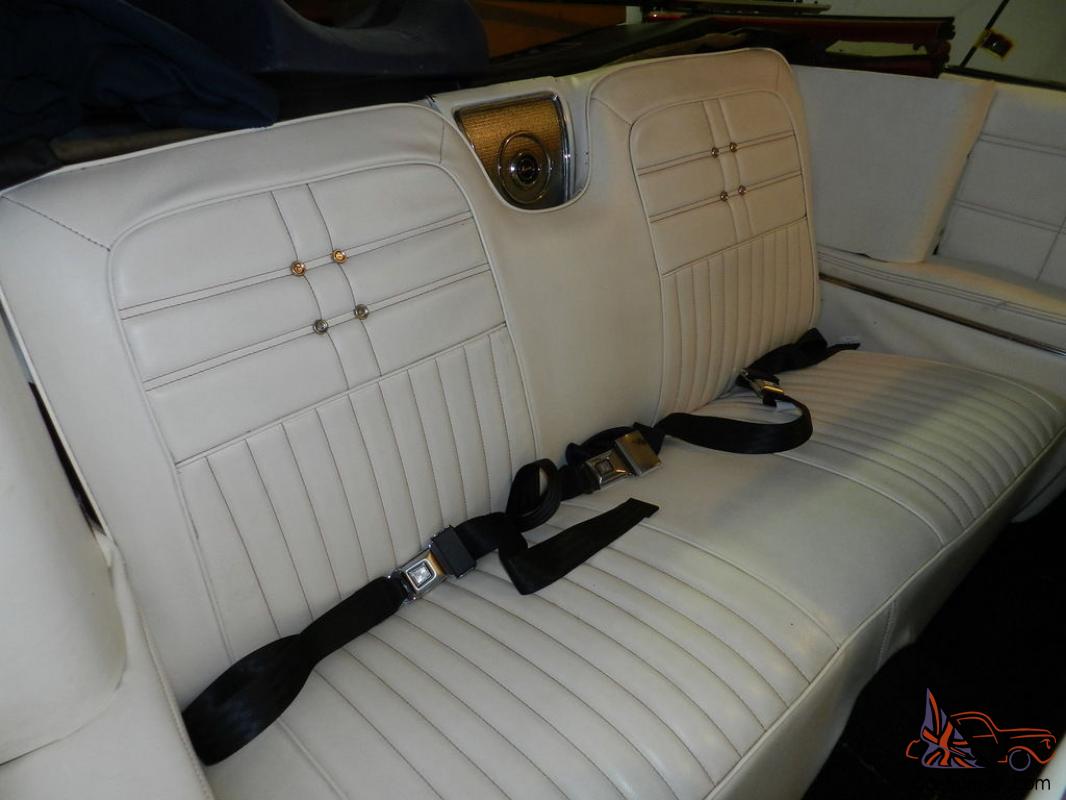
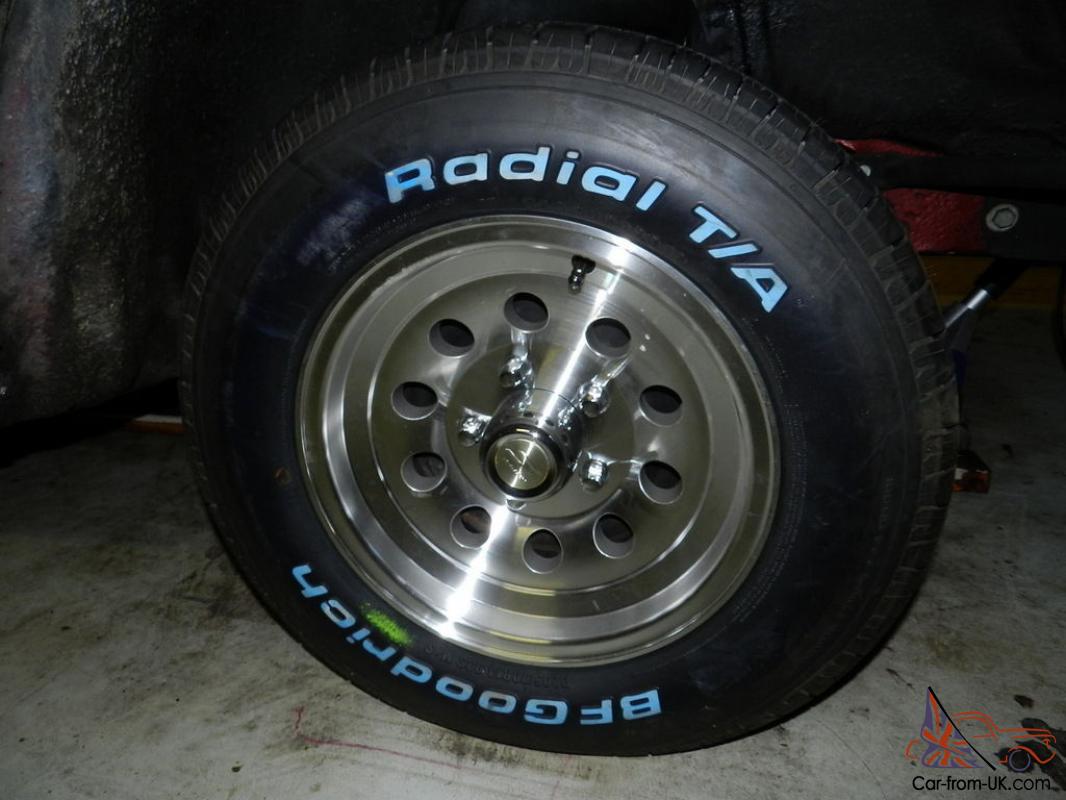
This 63 Impala has been upgraded with all factory original parts to make it a Super Sport. there is absolutely no difference in this car from a factory original model. I just felt it necessary to disclose the car's full history. The bumpers are very nice and without rust. go on and read my detailed description. In addition to all the work listed below I replaced the wiper motor 8-03-2014 and installed a new wiper control switch so this car will now pass a rigid PA inspection if necessary! ALSO NOTE - You take a real good look at the detailed work list [131 items done] I've kept on this car and you may just get the impression that I'm crazy for selling it without charging a dime for all my labor and effort. I've done an incredible amount of work fixing everything that needed done and also making some nice improvements such as the modern stereo system with Pioneer speakers. THIS CAR IS A DEAL!!! This is my 1963 Impala SS Convertible Clone but I have come to find out it is not a real SS car. but it is a real good clone as they call them. A no rust solid body Chevy. I think it has all the correct marking as an SS as far as I can see. I have been busting my butt fixing this car up since I got it almost 2 years ago. My list of things done and time spent is very impressive but it still needs a decent paint job. The Convertible Top is Red and in fair shape with a decent rear window as well. still needs a pump and lines if you want to put it up and down a lot. The top works fine manually and frankly. I never have a convertible top up once the season arrives. I figure you just take it out for nice rides after the sun goes down so what is the point of making the car more expensive in order to put the top up while the car is in the garage anyway? Remember. you can raise the top by hand if you get caught in the rain. Having turned 70 years old in April 2014. I'm just too tired to even enjoy this car anymore. One of the first things I did was buy and install 5 new RWL tires with gorgeous mag wheels. The car has never even been on the road with its new skins. [5] BRAND NEW TIRES AND WHEELS. that is [5] including the spare! I put in four [4] NEW SEAT BELTS + extra in rear for five [5] passengers total. The trunk has been properly painted with the original type speckled paint and has a CORRECT JACK as well. I put on two brand new cool looking angle style original looking trunk aerials for the stereo system. Its got a NEW STEREO SYSTEM radio with brand new speakers in the dash and in the new high end [Pioneer I think] speakers in the kick-space panels as well. I put in a whole NEW WIRING HARNESS from the dash to the rear and it even has all the right wires for operation of the convertible top pump. ALL LIGHTS WORK right now but I had to use an auxiliary switch for the back-up lights because the car has an aftermarket floor shifter without a reverse light switch. The AFTER MARKET FLOOR SHIFTER has a bit longer throw than the stock unit so the front console needs to slide a bit in its mounting brackets to accommodate the longer than stock shifter throw. The shifter runs a newly replaced [new. not rebuilt] TH-350 THREE SPEED AUTOMATIC TRANSMISSION in place of the old power-glide 2-speed unit. Its driven by a [think 1969] 350 cubic inch engine with an EDELBROCK four[4] barrel carburetor and aluminum intake manifold. I have really dressed the engine up with a NEW/REBUILT DISTRIBUTOR. NEW ALUMINUM WATER PUMP. NICE BLACK CHEVY LOGO VALVE COVERS. NEW ALUMINUM WATER PUMP. NEW ALTERNATOR. NEW POWER STEERING PUMP. NEW HEATER CORE and NEW HEATER HOSES along with ALL NEW CHROME PLATED PULLEYS AND BELTS. The car has a traditional set of THREE GAUGES mounted under the dash on the left side of the steering column so you can tell if the engine is not charging. has proper oil pressure or if it is overheating. If it overheats in slow traffic. there is an auxiliary electric cooling fan and I put a proper switch with pilot lights for the fan and back-up lights as well. All my wiring work is first class because I am a graduate Electrical Engineer. I did also rebuild the steering column with new bearings and put in a new power steering pump and stainless lines. ALL NEW WINDOW CRANK HANDLES AND NEW ARMRESTS have also been installed by me. I am writing all this from memory only so I probably missed something. OH. yes. I took out the seats and put in a BRAND NEW BLACK MOLDED CARPETING as well. This car should be a reliable driver once again now and you can have it for summer fun year after year. I don't think I am asking anywhere near what this car is worth considering my good labor but all I want to do is get my real cost money out of it at this point. The car is subject to local sale so do call me if you are serious about buying it promptly. If you put on a new top and get it painted I'm sure it will be worth as much as $50. 00. 00. Did you see that it is missing the rear quarters side SS trim? New/almost new SS aluminum trim + new clips for the rear quarters goes with car. Be sure to read all the way down! PICTURES>>> OK. just for all you fellows who don't know what a nice 63 Chevy looks like. I got my wife to take pictures Saturday afternoon and they are now added for your review. I told you the thing was nice didn't I?. It looks so nice I'm thinking maybe I'm selling it too cheaply. If this car doesn't sell. as straight as it is. I am thinking I really should get it repainted and get some real money out of it. However. since I don't really wish to fool with it anymore. I will leave further few possible improvements up to you. here is your last chance to steal this baby! Read down more! Incidentally. it is possible to see all the cosmetic scratches my wheelchair put on the body in the first picture BUT I have since applied touch-up paint over the scratches so they are not so easy to see unless you are right up to the car and looking for them [perfect color touch-up paint included with car - using this readily available candy-red color will made a repaint easy because you do NOT even have to do the door jambs or the inside of the trunk]. FOR SALE WITH LOW RESERVE - - I hoe get something for all the following listed work I really did on the car. Read down more! Thanks for looking - get a look at my work list below. I am a disabled paraplegic but I am glad I had the time to do this list. nobody. including me would ever be able to remember all these things. still. I sometimes wonder what I forgot. I am Guy at Harveys Lake. PA and the car is here in my garage. My phone is 570-639-2141. Thanks for looking. Now read down for work list. Repairs & Improvements to 1963 SS #2 Backup Copy As of 8/03/2014 1. Obtain and install new valve covers engine breather and cover gaskets on engine. [3] 2. Obtain and install new power steering pump + brackets. pulley. stainless steel wrapped hoses to steering ram. fill fluid and test OK. [6] 3. Obtain and install new distributor. wire clamps. ignition wires and plugs. set engine timing to 8 BTDC. [6] 4. Obtain and install brackets and transfer/relocate alternator to driver's side of car as original. [8] 5. Obtain and install new aluminum short water pump and dual pulley. [3] 6. Obtain and install new crankshaft pulley and all new belts. [2] 7. obtain and install new fan blade spacer and washer to obtain proper fan alignment. [x2=8] 8. R&R rebuild heater blower resistor + traced and fixed wiring to fan motor. [4] 9. O&I new heater core. remove fender shield and install. Paid John $106. 00 for fender shield work. [4] 10. O&I new heater hoses. run car and tested for heat/defrost multiple speeds = OK. [4] 11. O&I wiper motor. reattach wiper linkage under cowl. rebuilt washer pump and install reservoir. [does not pump yet] + must still install washer jets once pump is working. [8]******NOTE to replace pump 12. Research trunk wiring and found non-repairable. ordered new deck lid harness from Classic Industries. [2] 13. O&I Battery hold down bracket and bolt to radiator support. [2] 14. O&I new dual coil front speaker under dash + returned wrong item. [2] 15. O&I Wiring for both left and right kick panel speakers &tested OK -- Now ready for speakers. [2] 16. R&R AM-FM CD player with new wiring to all speakers. [2] 17. O&I active antenna to rear starboard side of car = run antennae wire up to inside dash at radio location. [3] 18. O&I new dummy antenna on rear port side of car. [1] 19. O&I sheet metal patch panels in trunk covering holes/low-rider-stuff +5 cans special trunk paint applied. [10] 20. Remove old wire wheel rims and tires and dispose of them. used new air wrench off over-tight bolts. [8] 21. R&R brake drums to inspect brake linings = OK. [1/2] 22. O&I total of five [5] new aluminum rims with new tires and install on car. [8] 23. O&I Aluminum trim on bottom of starboard headlight bucket. [1] 24. Changed oil and remote oil filter as well. (10w-30w Valvoline premium). [4] 25. Reattached three [3] dash light bulb holders that were not installed under dash. [1/2] 26. O&I new glove box after all dash wiring is done + R&R old box X2. [3] 27. Install wiring for auxiliary gauge lighting into fuse box. [1/2] 28. Remove glove box door x2 finally to replace speaker and glovebox. [1/2] 29. O&I missing bolt for bumper bracket front starboard to frame. [1/2] 30. Remove front bucket seats to access under dash and get ready for new brackets & risers and carpeting. [6] 31. O&I missing bolt for emergency brake foot actuator also tightened loose nuts under hood on firewall. [3] 32. O&I new speedometer cable - new TH-350 tranny to dash speedometer gauge + affix to clamp on firewall. [4] 33. Lubricate rear window mechanisms 34. O&I new door main window cranks on both doors. [3] 35. O&I new door opening levers and door armrests on both sides. [6] 36. O&I vent window crank units from John and install with new cranks - both sides. [4] 37. O&I new door main window cranks on both doors. [2] 38. O&I new chrome door lock pull buttons + O&I lock pull shaft from John. [1+1/2] 39. Cut off welded brackets + provide new as required to fix/relocate dual exhaust system - both rear tailpipes too close to accommodate larger new tires. [6] 40. O&I new starboard door panel fiberboard. R+I covering x2. paint carpeting x2. install w/new screws [10] 40. Buffed out scratches in windshield glass - result of running with rubber missing on old wiper blades [5] 41. O&I new wiper blades using original arms re-installed after R&R of cowl grille to access linkages. [2] 42. O&I New Chevy Optional chrome exterior door handle decorative trim to replace pitted originals. [1] 43. Tighten nuts on upper trim - driver's side headlight buckets. [1/2] 44. Obtain & Replace missing fixation on port headlight buckets and grille. [1/2] 45. O&I missing bolts for fan shield/shroud x 4. 46. Remove steering wheel to repair turn signal switch and access for bearing work. [2] 46. R&R steering column. install new upper and lower bearings on shaft. lube. [10] 47. Repair turn signal switch. install new cancel cam and run new horn wiring to existing switch. [2] 48. Re-install steering wheel - tested horn N/G. R&R wheel again. fixed pinched horn wire - tested. [2] 49. Repaired perforated frontal starboard wheel housing w/PC-7 under battery + spray-paint black [4] 50. O&I new clips + nice spare rear quarter super-sport impala moldings on both sides of car [estimated 10] 51. R&R door moldings w/ new clamps from above kit. [4] 52. Reattach last two SS moldings on both front fenders w/epoxy. [1] 53. Epoxy and clamp down stainless molding around starboard side of top well. [2] 54. Epoxy and clamp to cure stainless molding on outside of starboard door [1] 55. Epoxy and clamp to cure aluminum dashboard trim around radio area. [1] 56. O&I air vent control on left side of dashboard. [2] 57. O&I water guard on passenger door. [2] 58. O&I dual horns- fabricate bracket & wire to existing relay. 4] Total 214 to here to 2-01-2014 ++++++++Beginning of March. 2014 time reference point. 59. Removed seats. consoles/shifter. and carpeting - to facilitate the following items of work (items60-6x) . [6] 60. Searched out and repaired wiring under dash. studied 4 books to ID cut off wires. tested OK. [9] 61. O&I New switch to control auxiliary radiator cooling fan. [3] 62. O&I fasteners to reposition and mount transmission oil cooler assembly for TH-350 transmission [3]. 63. Remove Radio & epoxy case bracket to dash. facilitating wiring check for Lighter Install [2] 64. O&I New Cigar Lighter ASSY Adapt 63 style knob to 64 type lighter assembly+ new wiring under dash. [4] 65. O&I The AM/FM-CD Stereo with new power feed from Accessory side of Ignition Switch [3] 66. O&I Brackets to properly align front bucket seats + Get 3/16 steel & fabricate 2 inch seat risers &install. [3] 67. O&I Used kick-Vent control cable from EBay and install to proper dash location. [3] 68. Locate source of constant power in fuse box & tap in and provide constant power to radio memory. [2] 69. Remove ignition switch & rewire radio to power from the accessory switch position instead of ignition on. [4] 70. Study wiring diagrams to make necessary repairs to wiring for tail lights. backup lights and brake lights. [2] 71. Locate constant power source & wire to existing switch behind AUX gauges to control DOA backup lights. 72. Examine wiring in vehicle. locate green wire for backup lights and jumper to #72 green wire to trunk. [2] 73. Abandoned green wire above after study + used factory green wire inside of light switch connector. [2] 74. O&I Blue LED lamp. drill dash and wire to same switch as above to alert when backup lights are on. [2] 75. O&I New switch under dash near ashtray for auxiliary radiator cooling fan + tested OK. [1] 76. O&I Red LED lamp. drill dash + wire to fuse panel power source-indicating above fan/switch is on. [2] ========== OPERATOR'S NOTES: To do>> Whenever Temp Gauge reads above 200 degrees or Hot Warning Light on dash lights indicates red. operate cooling fan switch under dash ashtray - blue LED near keyswitch indicates ON. Red LED near key switch indicated backup light switch under dash behind gauges indicates backups ON. =========== 77. Inspected condition of trunk wiring/butchered. ordered new trunk deck lid wiring harness-ordered 3/18. [2] 78. O&I Glove box switch and lamp assembly ordered with above 3/18 (cost of both was $98). [3] 79. Installed trunk deck lid [upper] wiring harness 4. 12 found lower harness incompatible & ordered new. [5] 80. Install new lower trunk wiring harness w/all new lamp sockets and bulbs. Tested tail lights and function. turn signal switch. ordered new switch. Called American Autowire = top function reason is for extra wires. [8] CARPETING & SEATBELT PROJECT GROUPING: 81. Study Assembly Manuel for location + Drilled eight 7/16 holes for seat belt installation in floor. [2+1/2] 82. O&I new accelerator pedal mounting bracket on floor prior to carpeting. tested pedal location OK. [2] 83. Checked all stock supplies N/A - prepped for carpet - got 2 quarts. of contact cement at Wal-Mart. [2+1/2] 84. O&I new Black carpeting in main cabin = cut to fit over to eat brackets and floor shifter. glue down. [10] 85. Modify new accelerator pedal for heavy carpeting & install over special floor mount. [2] 86. Locate and make holes in carpet for seatbelt bolts. get 3" bolts + drill two deeper to for dbl floor. [3+1/2] 87. Jack up car and installed four new seat belts + used one old belt for center {hidden under} rear seat. [21]* 88. Clean floor area under rear seat and clean seats and rear side panels/bolsters w/505 detergent. [3]* 89. Paint seat brackets. floor area under rear seat and upper firewall black/refresh prior to installing seats. [4] 90. Lubricate rear window mechanisms w/white lithium grease (hope they wear-in better in future) [1+1//2] 91. Trim carpeting. glue down loose edges and install side panels/bolsters ordered console brackets 4/11 [5] 92. Attempted install of storage console and shift console. shift done but need brackets for storage console. [5] 93. Re-shim alternator bracket for better alignment w/ crank pulley and clearance for power steering belt. [2] 94. O&I new door jamb courtesy light switch on drivers side. hookup to new harness from trunk area. [3] 95. Got new switch and tapped jamb + installed passenger side courtesy light switch. tested OK 5-28-04 . [2. 5] . 96. O&I Drivers' side courtesy light fixture & bulb. came w/trunk area harness - tested OK 5-28-04. [. 5] 97. O&I Passenger side courtesy light door jamb switch. fixture and bulb. came w/new trunk area harness. [. 5] 98. O&I New kick-space panels with loudspeakers for stereo; wiring done only at this point. tested OK [2] 99. O&I retaining strips for kick panels/above - John explained convertibles do not come with retainers. [3] 100. Filed rough epoxy to facilitate kick panel installations above. snapped kick panels into place. [1] 101. Bundle wiring w/tape and place in driver's side wire channel trough from rear seat to left kick space [1/2] 102. Install 14ga. white wire under R-seat to behind drivers' kick panel for future Top Pump. [1] 103. O&I New aluminum sill plates. drilled new holes for screws/old holes were enlarged too much. [3] 104. O&I aluminum patch panels under rear seat on floor with PC-7 epoxy 105. O&I steering column seal over new carpeting. 1] 106. Obtained new PB brake pedal arm from John. wire wheel polished & painted and ash tray too. [3] 107. Removed two washers from alternator bracket for better alignment & PS belt clearance [3/4] 108. O&I complete lower trunk area wiring harness and connect under dash 5-13&14. [7] 109. O&I new glovebox lamp and switch - ran orange power wire to fuse box per diagram. [2] 110. Tested lights and found bad rt. Turn signal indicator lamp. replaced. tested OK. [2] 111. Reinstalled driver's side sill plate over new wiring harness to trunk. [1] 112. Cut and installed 'U' channel w/epoxy for holding in kick panel speakers. installed speakers. [3. 5] 113. O&I New power brakes pedal assembly. painted + put on new pad. looks great. [3/5] 114. Removed upholstery from driver's side seat bade and found bad foam bolsters. ordered new foam. [2] 115. O&I new seat base spring set on driver's side to improve driver/driving comfort. [5. 5] 116. O&I Storage Console using new mounting bracket. put spare shifter console brackets in glove box. [3] 117. R&R turn signal switch in steering column. Tough job. align column. read for wheel now. [12] 118. Replaced main light switch in dash and reattached wiring under dash. tested signals all 'A'-OK now. [4. 5] 119. Reinstall steering wheel. got better alignment w/ tracking straight now 5-28-14. [4] 120. O&I special trunk drain hole covers (2 covers). now ready for paint. [2] 121. Obtained & Painted 6 cans special trunk paint w/clear over the top. [5] 122. O&I trunk mat set (heated in sun to soften) over top of new paint job. looks great! [2] 123. Reinstall all seats - a very difficult job. painted seat brackets and radiator top. [6*] 124. Tested under dash courtesy lights. all OK after new light switch install. [1/2] 125. STOP and put away tools and misc parts in shop. organize remaining things for installation. [6*] 126. INSTALLED - provision for top switch - check diagrams-n/a. called Am Autowire as per #80 above - need to get power wire that runs from starter solenoid to firewall and connects to HD red wire near fuse box. All wiring to pump location came with trunk harness and plug for pump is lose in trunk upper left side. Noted that I have already installed an extra 14ga. white pull wire behind driver's kick panel and it is loose under rear seat. Noted: there are no diagrams showing convertible top wiring and the white wire might turn out not needed because of the new trunk harness installed Under #80 above! 127. O&I rubber "A" arm splash guards inside engine bay; drilled fenders and installed staples w/ helper. completes 7-30-2014 [8 hours] 128. Tighten nut on ignition switch nut [1/2] - done 8-02-2 [. 5 hrs. ] 129. O&I New Wiper Motor Switch in dash - done 8-02-2014 [1. 5 hrs. ] 130. O&I new rear window cranks - Completed 8-01-2014 - [1. 0 Hours] 131. O&I NOS two speed wiper motor & new wiper blades. works perfect now (not a rebuilt motor but a brand new old stock NOS one) completed 8-02 &03-2014 [8 hrs. ] --------------------------------------------------*Denotes job requiring assistant - and assistant's time is included in the hours recorded at each item. -------------------------------------------------------MANDATORY REMAINING TO DO LIST: nothing! OPTIONAL TO DO LIST: ONLY IF installing top lift. also need: CS36888 power wire from starter solenoid to firewall from Am Auto Wire @ $10. And a circuit breaker that mounts at the driver's kick panel. and a top switch that connects to the block hanging under the dash near kick panel on driver's side. Prep and paint entire car burgundy/close to existing color to minimize edge work - I have a paint code that matches the car nearly perfectly and will include a bottle of that paint with the car. What I mean by this remark is that a repaint of this car could be real easy and inexpensive because you do not have to have the inside of the trunk or the door jambs done. The door jambs and trunk lid inside are still in great shape from the original restoration. I have a set of longer/original springs for this car and will include them with the sale. Thank you.
I am Guy Giordano of Harveys Lake. PA at buzguy@gmail. com and you an call me at 570-639-2141 with questions. Final payment should be a transfer/deposit of funds into my Wells Fargo bank account before the vehicle leaves my home after inspection by the trucker or the buyer.
Also published at eBay.com
Want to buy this car?
Comments and questions to the seller:
Other classic Chevrolet cars offered via internet auctions:
 price: $24,995.001969 Chevrolet Nova
 price: $US $17,500.001971 Chevrolet Monte Carlo
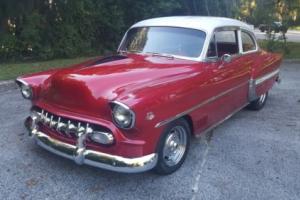 price: $15,000.001953 Chevrolet Bel Air/150/210 Hot Rod,Chevy,Bel Air,Custom,Classic
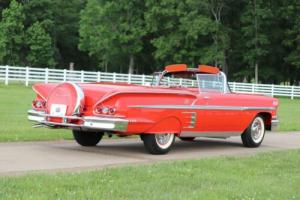 price: $140,000.001958 Chevrolet Impala
Latest arrivals:
-
 $35,995.000
 -
 $49,999.000
 -
 $21,995.000
 -
 $31,995.000
 -
 $37,999.000
 -
 $126,000.000
 -
 $49,995.000
 -
 $44,995.000
 -
 $29,900.000
 -
 $10,950.000
 -
 $29,000.000
 -
 $34,388.000
 -
 $39,398.000
 -
 $39,400.000
 -
 $41,301.000
 -
 $28,000.000
 -
 $10,601.000
 -
 $26,500.000
 -
 $64,900.000
 -
 $77,600.000