
Classic Cars / Volvo / Car for sale
Blown LS1 Swap, LSX, Magnacharger, Bagged, Cruiser, Rat Rod, Hot Rod, Sleeper
Sale price: $17,117.00 make an offer
Pending offers
Date: 2015-05-25
Benjamin Grams offered 19000 usd
Car location: Annawan, Illinois, United States
Sale type: Fixed price listing
Technical specifications, photos and description:
- Year:
- 1958
- Mileage:
- 8,000
- Got questions?
- Ask here!
Blown LS1 Swap, LSX, Magnacharger, Bagged, Cruiser, Rat Rod, Hot Rod, Sleeper for sale
Current customer rating: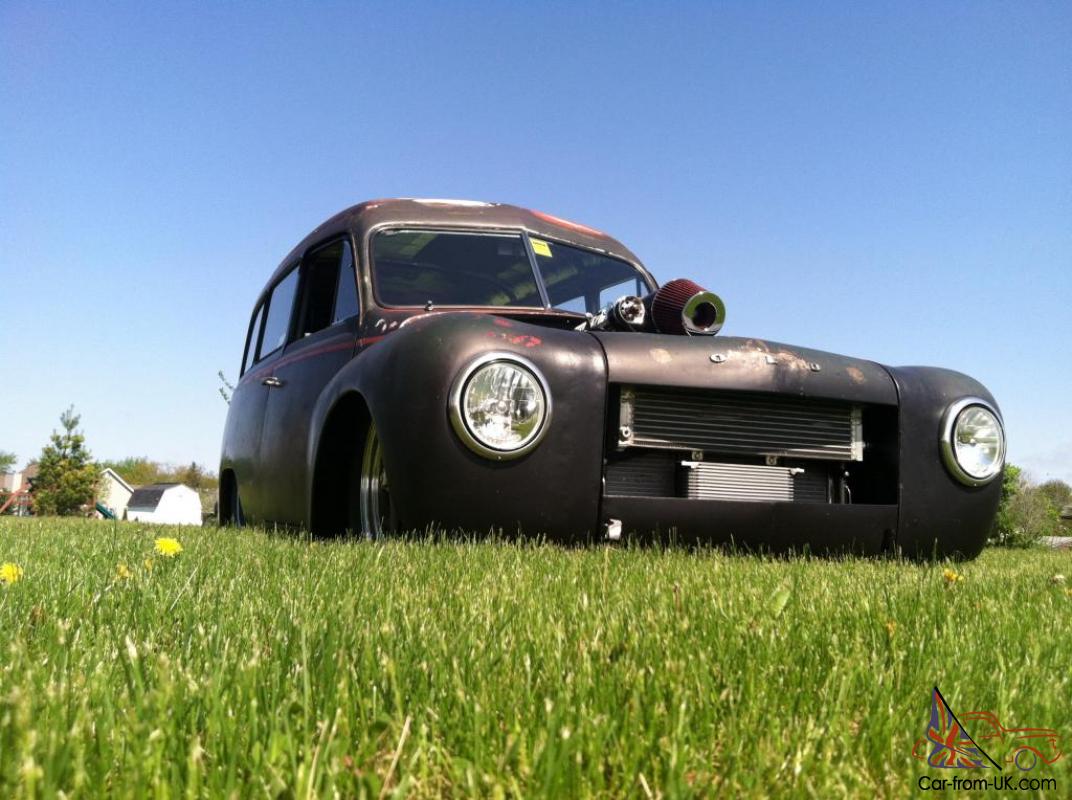

Love those Fat Fendered cars but want something more unique?
Really dig the rat rods but want something more civilized and comfortable. practical and reliable?
Like FAST cars? How about faster than a new Z06 corvette?
Like to get thumbs up and attention whenever you drive somewhere? Looking for the perfect car for the Power Tour? Something that you can haul stuff in too?
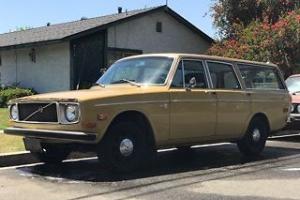
Have I got something for you. My 1958 Volvo PV445 (Duett) is for sale. No one knows what it is. but everyone thinks it's cool. Looks like a fat fendered Ford but about ¾ the size of one.
If you want a rat rod or unfinished project to drive. this fills the bill. If you want a finished ride. the body wouldn't take much to finish and then paint. there is no rust through and nowhere would require more than a ¼” of filler. The interior bones are done except for finishes. What I mean. is you pick the fabric colors and materials and have it done. The panels and console are done. The wiring is done. The stereo is done… You pick the colors and make it your own.
If you are a big person. the car will need the seating / pedals modified for you. I'm 5'8” and the car fits me fine. if you're over 6'. it will be tight until modified for your carcass.
Executive Summary
· Blown LS motor - 484hp / 540tq at the rear wheels
· 4L60E automatic transmission
· Remote controlled Ride Tech Air Bag system
· 1200 watt high end stereo
· Recaro seats
· Power windows
· Rare and Unique body style
· Rust free. solid body
· Fast and trouble free (8. 00 miles so far) >> 11. 20 in the quarter mile
Dyno tuning video
Closed course acceleration testing
My history of car
I found the stock rolling chassis for sale on eBay and made an offer for it after it didn't sell. The car is an original California car. Here is the original eBay ad text:
“I have a 1958 VOLVO 445 Duett van for sale. This vehicle was acquired from a gentleman who was in the midst of restoring the vehicle. A friend of his sold it to me and included all the parts that were removed from the vehicle. ”
Body Exterior
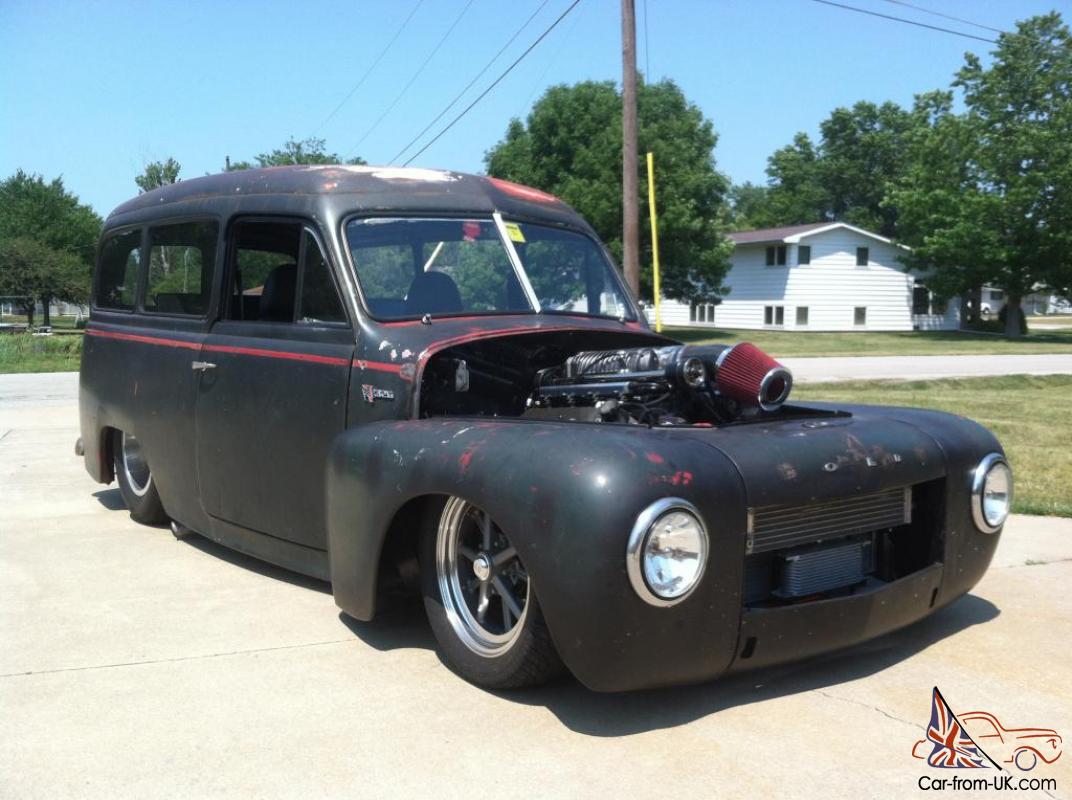
The outer body shell is largely stock. The only deviation is in the front end. The front fenders have been widened by welding in a 2” strip on each fender to allow the tires to clear the bodywork at full suspension drop. The grill opening has also been lowered (widened vertically) 1-1/4”. It was primarily for looks but certainly helps with airflow. The complete “core support” or front sheetmetal inner sub structure was created from scratch to accommodate a nice big cooling package and allow the body to sit lower on the frame (channeled). The result is very stock looking and straight. I also filled in the antennae hole and the stock fugly front turn signals.
The stock hood is quite blunt at the front. I remedied that with some styling cues from the early Fords and dramatically peaked it. It has billet hood hinges that open smoothly and a late model Volkswagen latch that is mounted from below for a nice minimized and smooth look. You can see in the pictures. a lot of work has been put into the hood. The current air filter and intake tube prior to the throttle body will not clear however. Either the hood needs additional modification (raised scoop or similar) or a new air intake solution be created.
Prior to me getting the car. the window seals failed and water damaged the bottoms of the door frames. inner rocker panels and front floors. I replaced the front floors with NOS parts and rebuilt the inner rockers from 18 ga steel. The front doors were repaired and sealed. They are very straight and wouldn't need replacement. The rear (barn) doors had enough rust from the inside that the damage came through the skins. I'd replace them. I have some better doors that go with the car. not rusty but more dented up. As they are now. they look all right. They would only need replacement if you wanted a shiny paint job. All the areas where rust was repaired was first sandblasted and treated with rust convertor. Then the inside and bottom of the car were painted with epoxy sealer. The entire bottom of the car was stripped. seam sealed. primered and shot with 2 coats of coat of ceramic spray on heat and sound insulation (lizard skin). There is additional sound insulation around the air compressor pump. (Still loud but every bit helps. )
Body Interior
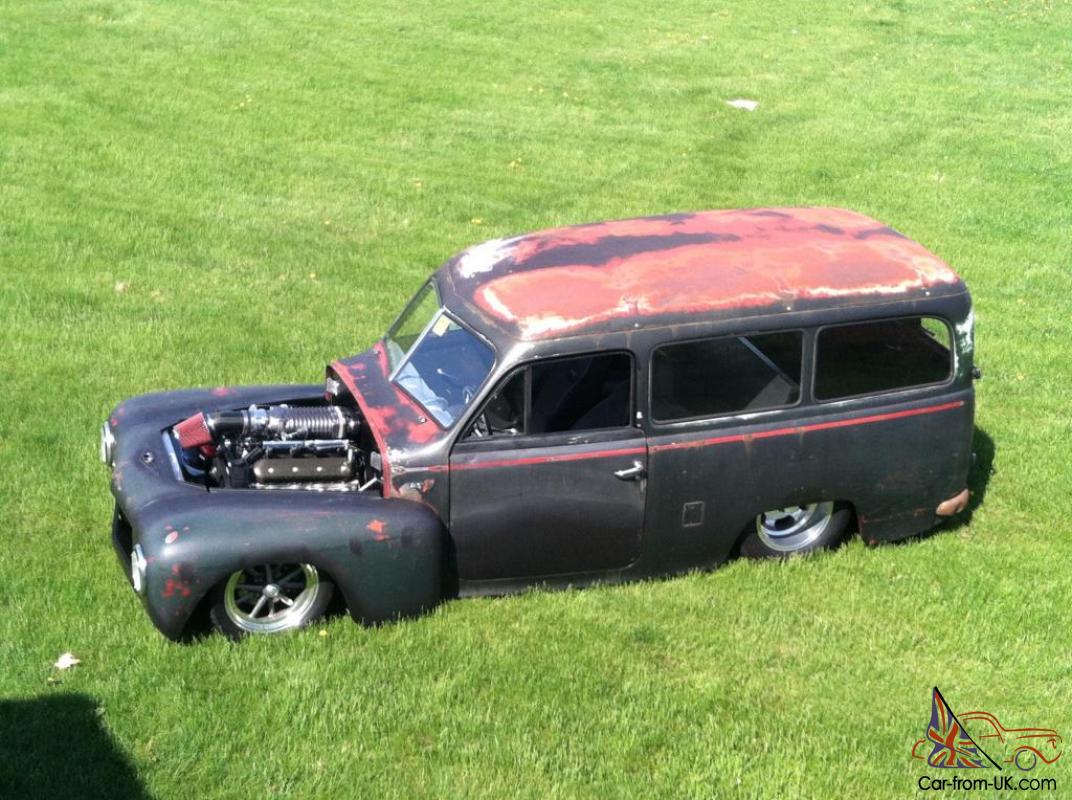
The car was wedged channelled. It was channeled ¾” in the rear and 2” at the front. This was done when the front floors and inner rockers were replaced. The factory firewall was removed and replaced by a flat sheet of 18 gauge steel that is bonded to a triangulated firewall structure of 1X1X1/8” square tubing. The front kick panel areas were rebuilt 1” wider for more foot room. (2) Full width pieces of 1” X 2” X 1/8” tubing floor reinforcements span from rocker to rocker to create a very stiff floor and serve as the seat and seat belt mounting points. Under the car. there is a 2 X ¼” steel driveshaft loop attached to these same floor braces. The floor braces meet the inner rocker panels at reinforcement plates and extra gussets. These are there to save your butt if things ever go really bad. The seats themselves are Recaro seats from a Cobalt SS. They are manual and the drivers seat bottom adjusts up and down. The seats bottom frame was modified to narrow them up for the car and mate to custom brackets. Seating position is very comfortable. As mentioned at the very beginning though. If you are a big fellar. it's going to be a tight fit. The car isn't cavernous in the front. Plenty of room for the passenger. though. Most big bodies will fit over there. It is the pedal / steering wheel placement that would be bad for Andre the Giant. The tunnel was hand formed to tightly contour to the transmission and driveshaft for maximum interior space. The front floor area has ¾” plywood over it with spaces for wiring to pass. The plywood makes a flat. perfect foundation for your carpet (or you could tile it I suppose). It is stained. sanded and sealed with 3 coats of polyurethane on all sides and bonded to the floor with silicone so it does not vibrate. Probably the best tip I've picked up from the pro's is to use plywood on your floor. No better noise and heat insulation for a floor.
Moving back. the floor under the seat bottom was cut out and raised 4” (LOTS of rear headroom still. Rear leg room. well. not so much). (3) Access panels for the battery. master electrical disconnect and brake reservoir are easily accessed and located under the seat bottom. The seat bottom (springs) has been narrowed to fit the mini tubbing. blasted and painted. Front seat belt anchor points were reinforced with 1/8” steel plate and welded in. The belts themselves are late model Volkswagen (black) 3 point retractables. The stock rear wheel tubs were raised up. split and widened 4”. They have been filled and smoothed so they still look stock. The folding rear seat back was cut down. narrowed and had the latch mechanism rebuilt. The piano hinge was refreshed and still allows the seat to fold forward like it used to. There is a roll formed piece of 18 ga steel that fills the area behind the rear seat to the rear floor. The rear 2' of the floor are stock except for the frenched in gas tank cover.
All interior body panels were scuffed. blasted or stripped and painted with epoxy sealer and then covered with dynamat extreme. Roof. inside doors. firewall. transmission tunnel. EVERYWHERE. The interior roof also has large panels of acoustic foam glued to the roof with contact adhesive so they won't come off under the future headliner. The roof has (2) light sets from a late model SUV with center and aviation light pods. There are also kick panel lights up front. The interior lighting works with the doors like it should using (7) pin stainless door jamb switches. The additional wiring contacts are for the power windows and front speakers. The extra contacts are pre wired with a coil of wire for future needs (door locks. door courtesy lights…)
Interior panels are made from ¼” hardboard and are painted semi flat black on the inside and sealed with epoxy on the inside to protect from moisture. Behind the driver's side back seat panel is a fuse panel for the air ride controller and some sub wiring systems. The air ride control box is also mounted there.
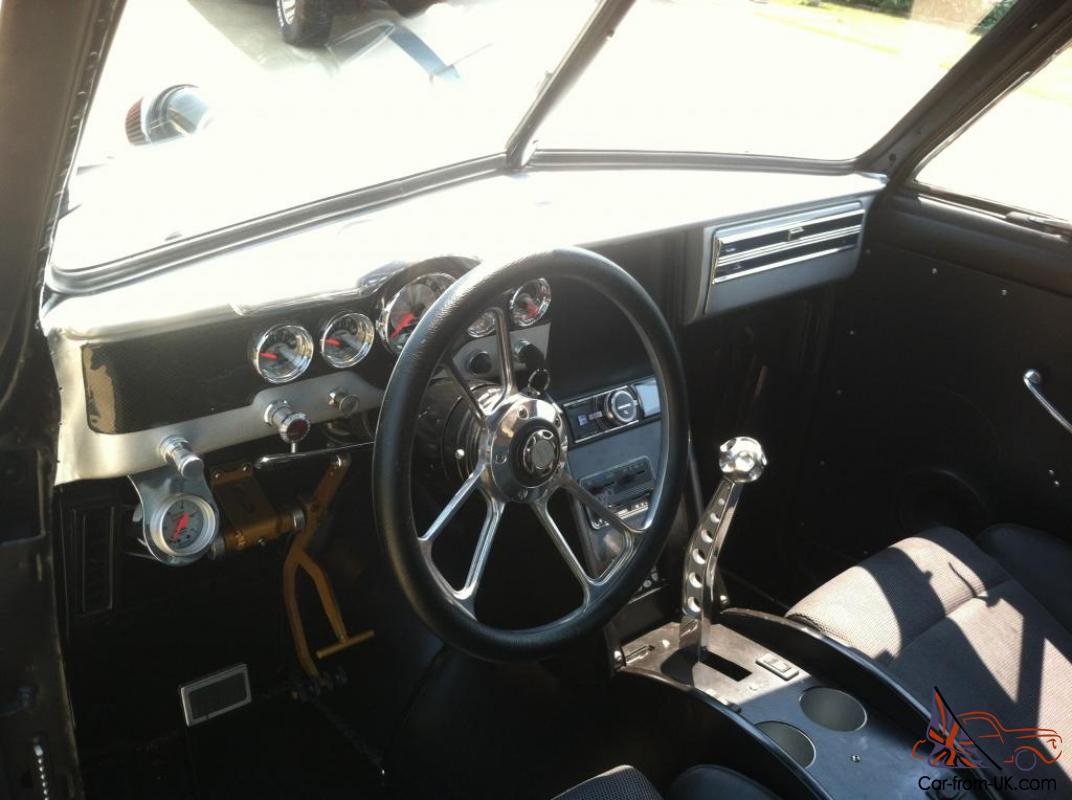
Dash / Gauges
The dash is kinda stock. The gauges have been replaced with $700 worth Autometer American Muscle gauges that sit on a carbon fiber gauge panel (Speedo / Oil / Water / Volts / Gas). The gas gauge float arm came off the sender in the gas tank. so it needs to be reconnected to work again. The center of the dash was tunneled for the console. filled and painted with a base / clear metallic silver. There isn't much room behind the dash for anything because of the large marge vintage air gen 2 setup. The glovebox door works. there just isn't a glovebox. but you could build a shallow one for things. There is the factory ashtray built into the center top dash. Not installed is the matching tachometer ($200) that is included with the car. (I never decided where to put it. ) There is also an Autometer boost gauge mounted in a fabricated and polished aluminum pod at the lower left. Mounted on the bottom edge of the dash (discreet but still visible) is a check engine light and alternator light to warn you of problems. The OBD II port is located there alongside a manual fan control switch. The headlight switch is a Ron Francis unit with dimming control. An old switch that lights up when activated (for the line lock & gratuitous burnouts). the windshield wiper control. horn and Ron Francis ignition switch. The steering wheel is a polished. billet half wrap “Famosa” adapted to the old Volvo column. (The steering wheel horn does nothing).
Radio
The radio is an Alpine iDA-X305S media player. there is no CD player. IT NEEDS REPAIR – the left front speaker channel is not functioning. Even with that handicap. it still sounds fantastic. The repair is to buy a new radio off eBay or have this one repaired. Pull the old one out and plug the new one in. No wiring to unhook or anything. literally a plug and play fix. The front & mid speakers are powered by a Kenwood eXcelon XR-4S (120 watts X 4). Sub amplifier is a Kenwood eXcelon XR-1S (700watts). The front speakers are Boston Acoustics Pro Series 5-1/4” components. The rear speakers are also BA component Pro's in a 6-1/2” size. (2) Rear subs are Rockford Fosgate 12” single voice coils wired in series. All speakers are housed in custom multi layered fiberglass enclosures to both protect them and also to make them work right. The rear sub enclosures are sealed and at about the minimum interior volume. The stereo is very fine stuff and it sounds fantastic either incredibly loud or just at normal listening level. There is a lot of money wrapped up in the system. It's all integrated nicely too. no ugly wiring. all hidden. The amps are sunken into the floor and all wiring is routed through channels milled into the plywood floor. The sub amp is mounted behind the passenger side rear seat interior panel. The 4 channel amp is mounted under the passenger seat.
Console and HVAC
The center console (upper and lower separate for service). was handmade as well. The upper contains the Vintage Air Gen 2 HVAC controls. Ride Tech Air Bag Controller and radio. Mounted on the side is a vintage cigarette lighting / ejecting system. If you smoke. you'll love it. if you don't. you can sell it for $150 or so. The AC ducting behind the upper was considerable modified due to space constraints. To get the system to distribute air throughout the vehicle. new hand laid fiberglass ductwork was made for to take air and duct it to the rear seat floor area through the lower console. (Works very well. ) The defrost vent was similarly modified to mate to the factory Volvo defroster vents in the dash. The HVAC works like a champ. I've driven in in 20º weather and while it won't roast you out. it definitely keeps you comfortable.
All the AC components are Vintage air. It is not functional at this point. All the parts are there to make it work. hoses. wired in… It needs the front end taken back apart and the condenser installed. The powder coated brackets are all made and ready to go. Then the hoses hooked up. evacuated. charged…. The only thing not verified are the hoses to – fro the condenser.
Both the upper and lower console parts were made from ½” square tubing. 16 ga steel and some 1/8” strap. Then the frames were covered in fiberglass and bodyworked smooth. All parts are removable and ready to be covered.
The lower console contains an iPhone dock for the radio connection (needs updated cable to function properly but is built in beneath the console cover so your phone sinks into the console just a bit. Lit power window switches mounted in the center as well as controls for the cup holders. The cupholders themselves are heated / cooled units and work great – they are built for a 12oz can though. Rear of console has open storage compartment. As mentioned earlier. HVAC ducting built into console and exits at rear. The shifter is a Gennie Shifter with a very cool polished handle topped by my favorite shifter handle of all time which comes from CSI.
Electrical / Rest of interior
All the remaining door hardware parts were cleaned. lubed and reinstalled. New parts (like springs) were used as available. New door locks were installed in the drivers and rear cargo door. All weatherstripping and window felt1 is brand new from Sweden. Power windows work great. Wing windows seal up. but the passenger side one is difficult to open. too tight a fit I guess.
The turn signal switch was rebuilt and works but doesn't self-cancel well so you are responsible for your own cancelling or looking stupid.
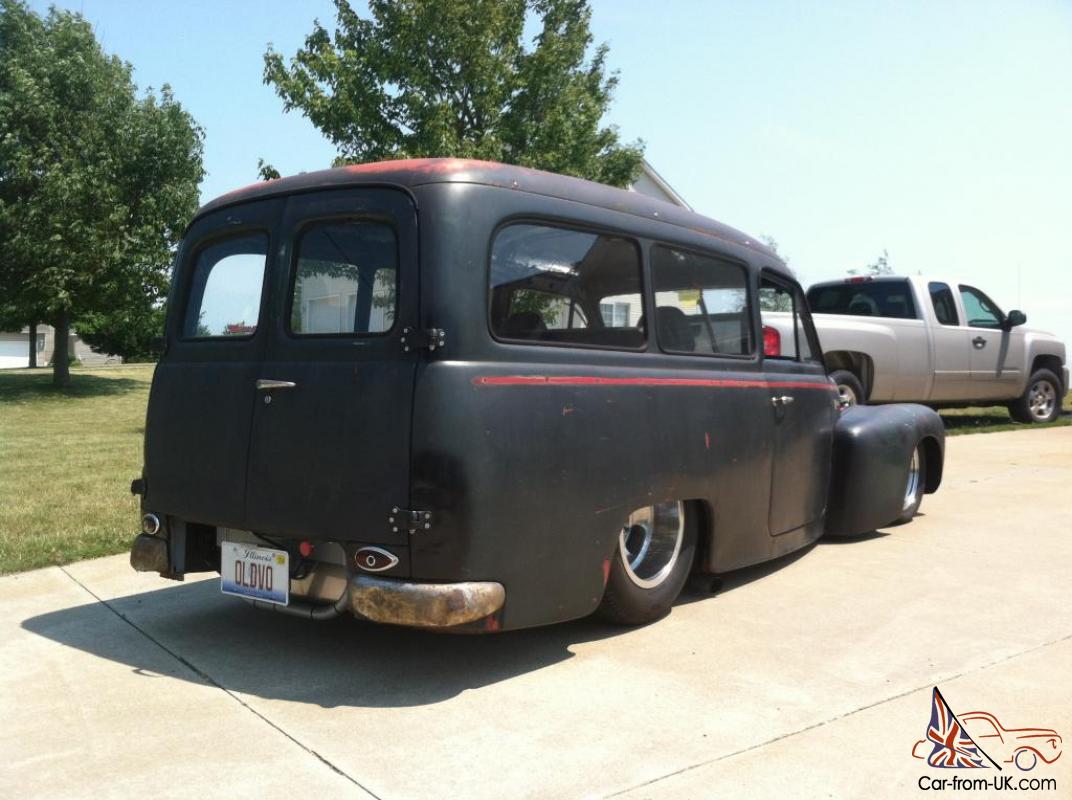
The headlights have built in LED turn signals. They are lit with bi-xenon HID bulbs. The ballasts and controllers are mounted on the headlight buckets inside the fenders. They are 6000K and work very well. They don't blind people and really light up the road nicely. The taillights are 39 Ford units with blue dots.
21 circuit wiring harness. fuse panel under drivers side of dash. Still has several un-used circuits if you want to add more stuff.
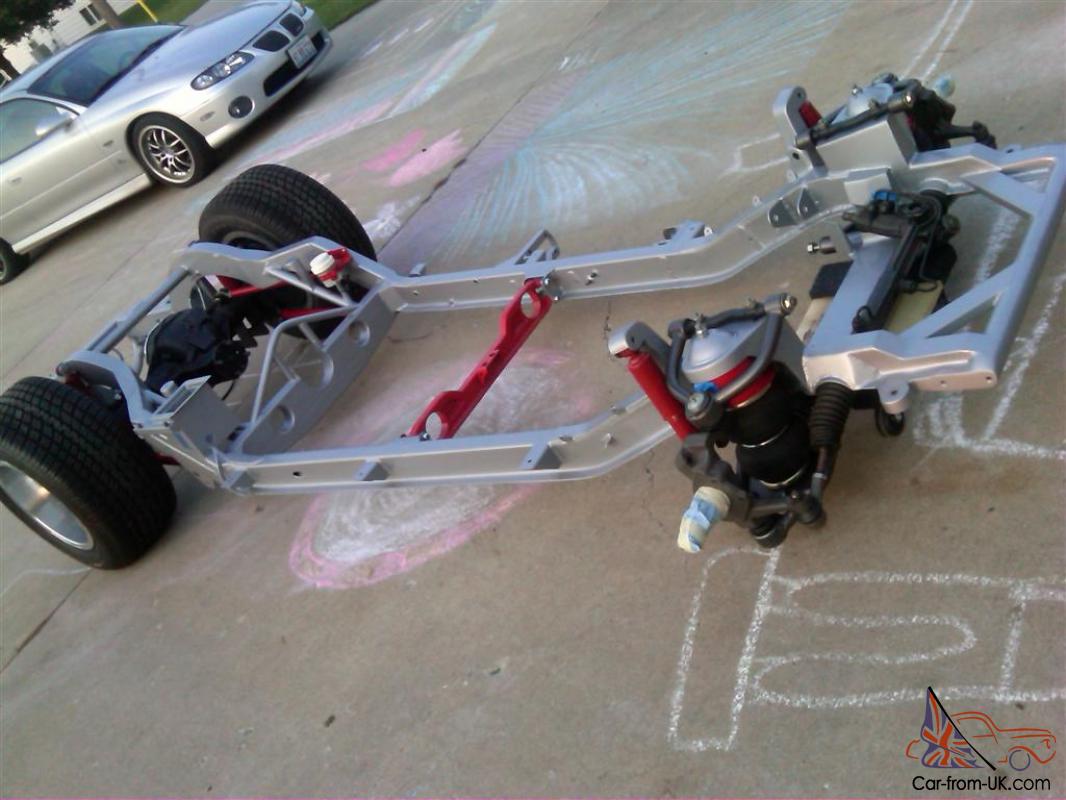
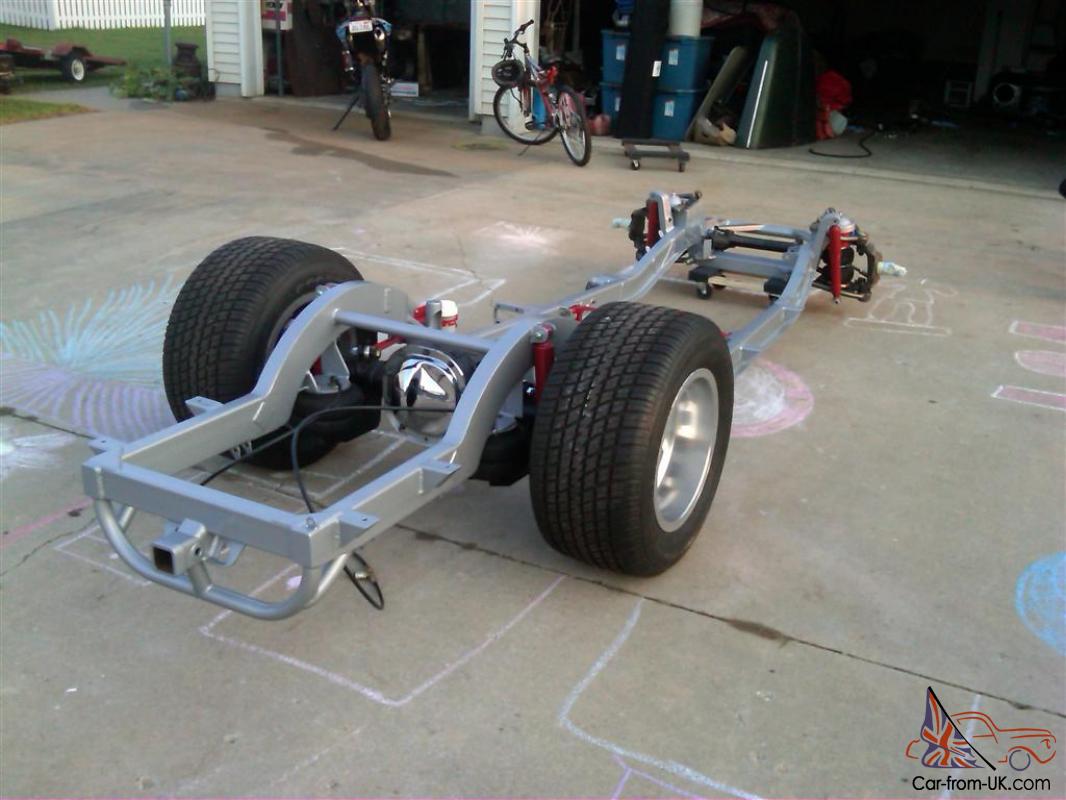
Frame / Suspension / Wheels
There is about 3' of stock-ish frame in the center. To fit the LS. I cut the stock firewall off. span > centered and fit the motor as low as possible (using a cut down truck orl pan) built the mounts out of round tubing and made a trans X-member to accommodate the exhaust passing through it. None of the inner stock sheetmetal remains. Structure for inner fender panels is made and in place for easy completion. The front frame was pinched and has a Heidt's Mustang 2 front end (2” lowered spindles). I built a 1” anti-roll bar for the front. The endlinks for it are heim joints. Suspension rubbery bits are all Energy Suspension.
The rear frame was built around triangulated my own custom 4 link. It was built to have (0) anti-dive at ride height so it is very neutral. There is 1” clearance at any place from the body to the tires at any position. The main sections of the rear frame are 4 X 2 X 1/8” tubing along with some round tubing for bracing and triangulation. The rear cross member has another driveshaft loop and cutouts for the exhaust. At the rear is a very stout mount for the Class 3 trailer hitch (built into the frame design) and wiring for a 4 pin trailer plug. The license plate is mounted to tubing that plugs into the receiver and the light plugs into the trailer wiring harness plug. At the cross member is also rear crash bars for fuel tank protection. The tank is sumped. tig welded stainless steel and holds just over 15 gallon. It is rubber mounted so you cannot hear the Walbro 255 fuel pump running or vibrating through the car. All body mounting points are rubber isolated similar to how a new car would be. Frame was blasted and primed with Eastwood rust encapsulator and sprayed with silver hammertone enamel.
The rear end is a narrowed Ford Explorer 8. 8” with the factory 3. 73 gears. a rebuilt posi. Moser 31 spline axles and ARP studs. The rear bags are more than capable of handling pulling a trailer (I've towed my 4 X 8' trailer a few times. )
Front tires / rims are Nitto 205/50R15 on 15 X 4” Team III E-T Gasser.
Rear tires / rims are MT ET Sportsman 295/50R15 on 15 X 10” Ansen Sprint mags.
Brakes
(Front) 4th gen Camaro rotors machined to fit the M2 spindles and made the caliper brackets myself. Calipers are from same Camaro and all parts for service are over the counter.
(Rear) Rebuilt explorer disc brakes with new rotors and pads.
Brake lines front and rear is bent hardline with stainless braided lines to the flexy parts. There are check valves since the master cylinder is mounted low. The booster is a hydroboost (power assist) mounted on the frame. The hydraulic lines for the brake boost are all professionally crimped and good to 5000psi. The return for the brake boost powers the M2 power rack after being regulated by the Heidt's power steering valve. The booster itself is off of a Mitsubishi Eclipse that has a remote reservoir located under the rear seat area. (Easy to access. ) The brake pedal has an adjustable pushrod to alter the pedal pad location.
Speaking of lines. all the hard and flexible lines (air. gas. battery cable. oil…) are mounted in handmade “billet” aluminum holders. Custom made. very slick. very neat. All the little bits were brushed then powder coated clear.
The gas pedal is a $160 ball bearing stock car piece because it looks cool.
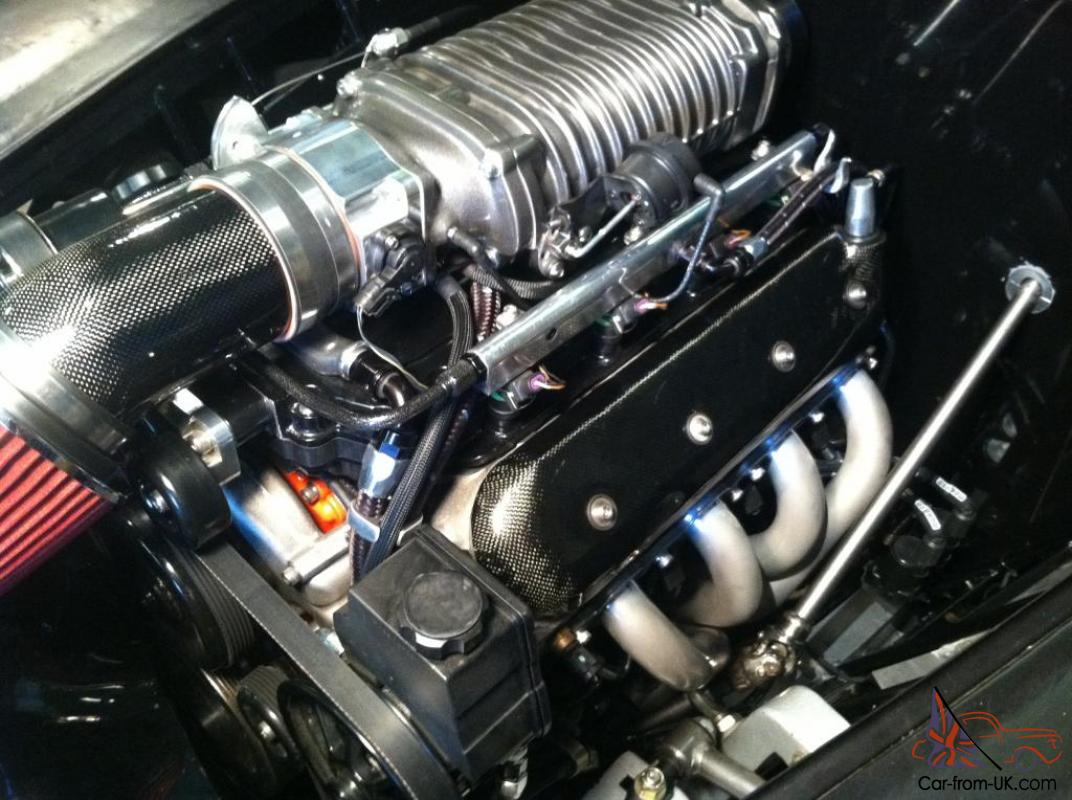
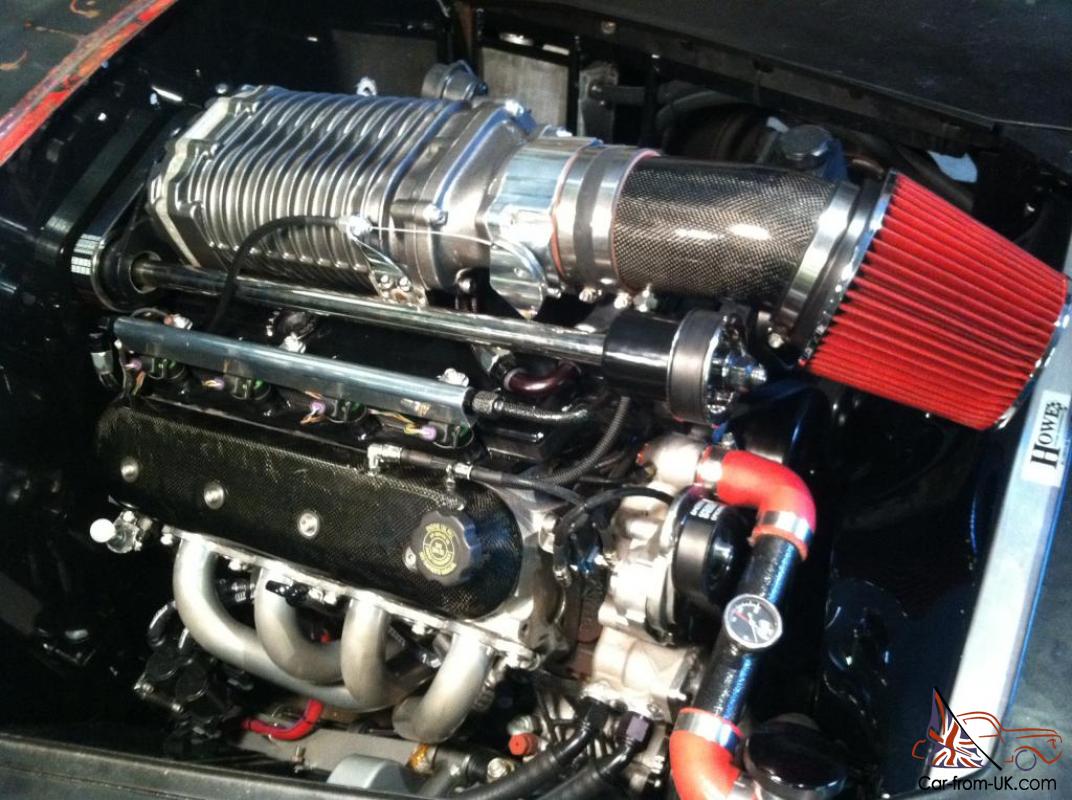
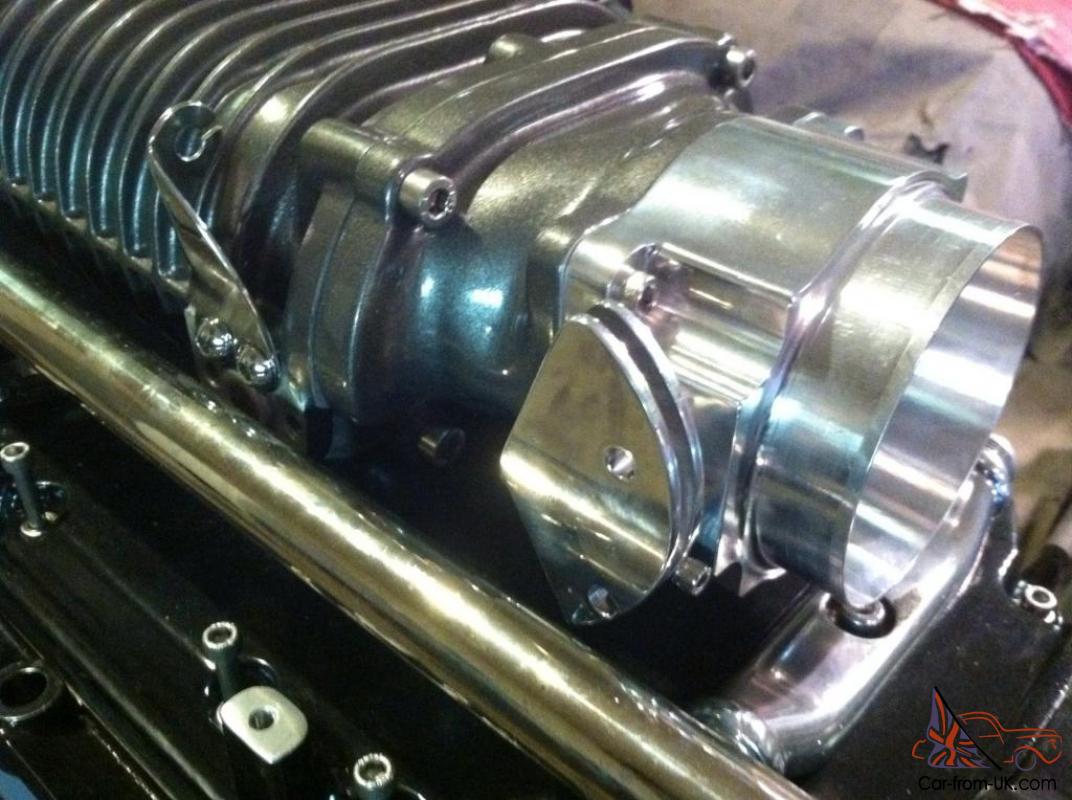
Engine
The motor came from YatesEFI. com. Randy was the main reason the car has an LS motor in it. He hooked me up with the engine wiring harness and countless parts over the course of the build. new and used – the guys fantastic. really can't say enough about his service. The motor is an 80K 5. 3 LM7 (Chevrolet Gen III LS series). A 230 º duration on a 114º intake C/L cam was installed as well as new Patriot Gold dual valve springs an LS2 timing chain a ported oil pump and a Performance Products harmonic balancer was pinned to the crank. The blower is a Magnacharger MP112 kit. I dissembled and ported the blower. I made a 1” spacer for the upper and lower intake manifolds. this addresses one of the blower's biggest shortcomings. Along with 1:1 rear blower pullies and a grooved. lightened drive pulley. it makes 14psi. The heat exchanger fills the upper part of the grille area. It is fed by a Mezierre remote water pump and used ¾” braided and formed water lines. One thing you won't find anywhere else is a high boost Magnacharger that experiences NO BELT SLIP. I got sick of the band-aids and made my own permanent solution. It is a hydraulically assisted unit that only applies during boost. Doesn't use stupid spring pressure that eats belts. I've had the same belt on for over 6 months and it looks fine. Air gets to the blower via a polished Nick Williams 90mm TB with the remote IAC. beautiful piece. Has ceramic coated Sanderson headers that dump into a 2-1/2” mandrel bent dual exhaust with an H pipe. Magnaflow stainless steel mufflers and exhaust dumps in front of rear tires. The exhaust rattles at light load cruising speed. Comes and goes but the exhaust needs to be loosened up and adjusted to get rid of that damn rattle. The coils were relocated to down and back on my own brackets. New Taylor wires with Moroso Ultra 40 shielding sheath on them. Jim at Speed Inc. (Schaumburg. IL) tuned the car where it eventually made 484 / 540 at the wheels. Burns regular old 91 octane gas and doesn't detonate. smoke. rattle – just a bit of sweet old school cam lope. Starts and runs like a new car.
The transmission is a 4L60E that I installed a Corvette servo and B&M shift kit. It also has a 2800 stall lockup and large cooler mounted low and in front of grille opening. Braided hose and hard lines from transmission to cooler.
I've had great luck with Howe. so they made me a new dual pass to my dimensions. I built the fan shroud using a metal frame and laminating fiberglass around it. It's cooled by (2) 12” Spal fans and has never overheated. even in 100º weather stuck in traffic. Everything fits pretty tight and neat.
I did all the work on this car in my garage. Every weld. every nut and bolt. every laminated piece of material. EVERYTHING. This isn't my first car I've built. My first one is a Geo Metro drag car (which eventually went 9. 25 @ 157). Search YouTube for “9 sec Geo Metro” if you're interested. It's the Geo boss !
This car was in a front end collision after it was built. No frame or suspension damage. It took out the front sheetmetal and cooling package. I rebuilt it myself using fenders from a parts car I have. The donor car was the same color and condition. the patina matches perfect. If it worries you that the car was wrecked. then you should be worried about the whole car cause the same person fixed it that wrecked it and built it. I actually made it better than it was before. fixed a few things I would have done differently the first time.
I've tried to be as truthful as possible about this car and will stand behind it. I'll answer any questions sent to me and submit more pictures as requested.
Vehicle can be driven home. You don't need a trailer. fly in. I'll pick you up and you can drive it home. I will help with your trucking arrangements though.
$500 Deposit due at end of auction.
Vehicle must have arrangements made or be picked up within (1) week.
I can be reached on by phone to discuss additional questions about the car.
309-507-1108
7am - 9pm CST
Also published at eBay.com
Want to buy this car?
Comments and questions to the seller:
Other classic Volvo cars offered via internet auctions:
 price: $US $1,950.001971 Volvo Other
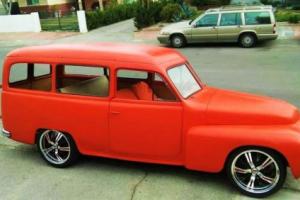 price: $US $5,000.001959 Volvo Other
 price: $29,900.00Trades Considered Financing Available $320 per month
 price: $7,200.001966 Volvo 122S
Latest arrivals:
-
 $1,000.000
 -
 $10,100.000
 -
 $5,500.000
 -
 $1,200.000
 -
 $18,990.000
 -
 $4,350.000
 -
 $2,500.000
 -
 $17,950.000
 -
 $500.000
 -
 $4,050.000
 -
 $3,000.000
 -
 $29,500.000
 -
 $13,900.000
 -
 $19,250.000
 -
 $0
$0 -
 $0
$0 -
 $14,000.000
 -
 $39,000.000
 -
 $16,500.000
 -
 $7,710.000